How to reactivate your FS11 sensors
Plan your planting season wisely
As you prepare for the new season, one of the most important things to do is to review the previous season. This will give you clear goals for the upcoming growing period. To help you with this, we created a precision farming checklist.
<<Download the precision farming checklist free>>
If you already have our sensors, you need to follow these simple steps.
Either
Reactivate your sensors with the same settings as last season
or Reactivate your sensors with new settings
If you want to reactivate the sensors you have in a different field or position.
Reactivate your sensors with the same settings as last season.
These are the steps to reactivate your FS11 sensors:
Step 1 – Clean the sensors
Remove any dirt or soil stuck to the sensor using a damp cloth and water. Check the cap; make sure that the o-ring seal is free of dirt. Do not clean the battery compartment with water, but make sure it’s free of debris.
Step 2 – Make sure you are using the latest version of the Farm21‘s app
Download from Apple store | Download from Google Play
Step 3 – Get new batteries*
After using the sensors for several months, the battery is not at full capacity anymore. If you stored the FS11 with the batteries still inserted, it’s very likely that the battery is empty. You can get the CR123A battery from our distributors, local hardware store or you can order them online (most affordable).
*Do not insert the batteries until you are in the field
Step 4 – Go to the field and activate your sensors
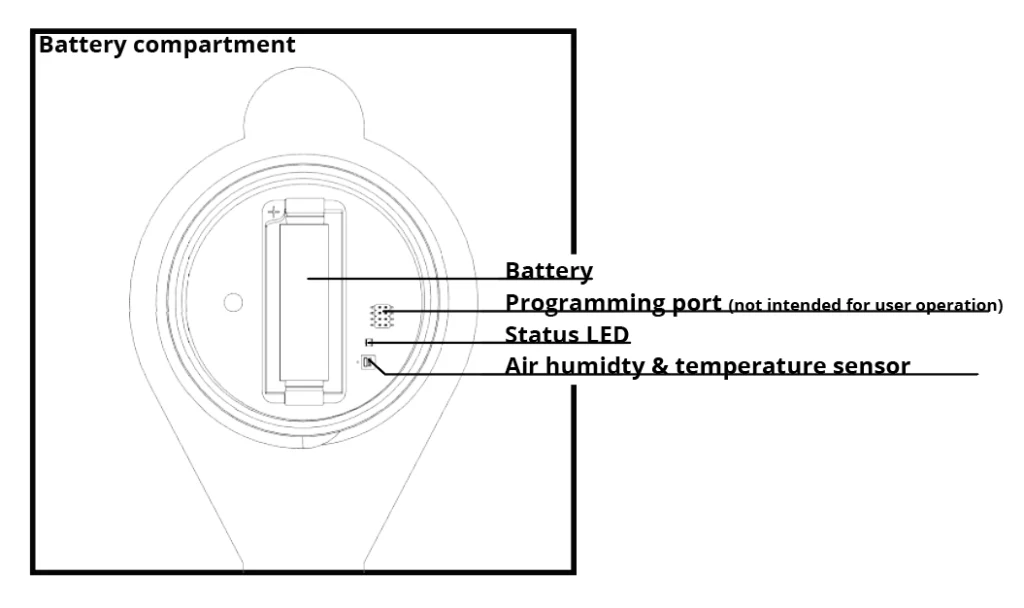
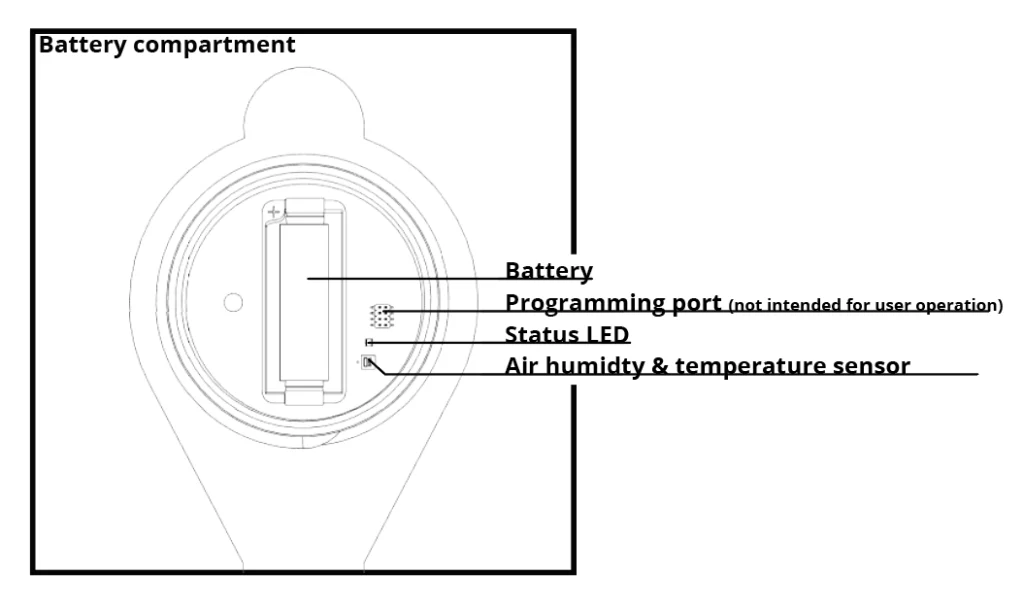
Insert the new battery only once you are in the field at the location where you want to measure. This ensures that the sensor uses the right signal strength, as it determines this at start-up. After inserting the battery correctly, the LED should light up. You can find the LED in the battery compartment, right next to the battery itself. If the LED does not light up, make sure you have a new battery and it is inserted correctly, make sure you screw the lid tightly back on the device.
If it is still not working, please contact us on the chat option or email us at [email protected]
Step 5 – Put the sensor in the soil
Create a slot in the soil using the soil peg and a hammer. Slide the sensor into the slot. Do not use force. If necessary, use a little water to loosen the soil.
You will start getting data to your Farm21 account after a few hours. If after 24 hours, still no data appears in the dashboard, contact Farm21 using the chat option or email us at [email protected]
Reactivate your sensors with new settings
If you want to change any sensor settings, like sensor name, calibration profile assigned field, or location, these are the steps to reactivate your FS11 sensors:
Step 1 – Clean the sensors
Remove any dirt or soil stuck to the sensor using a damp cloth and water. Check the cap; make sure that the o-ring seal is free of dirt. Do not clean the battery compartment with water, but make sure it’s free of debris.
Step 2 – Make sure you are using the latest version of the Farm21‘s app
Download from Apple store | Download from Google Play
Step 3 – Get new batteries*
After using the sensors for several months, the battery is not at full capacity anymore. If you stored the FS11 with the batteries still inserted, it’s very likely that the battery is empty. You can get the CR123A battery from our distributors, local hardware store or you can order them online (most affordable).
*Do not insert the batteries until you are in the field
Step 4 – Set up your fields
If you want to keep the same field setting then continue to step 5.
If you want to create a new field, you can either do this on the Farm21 platform (check out how to do this here – fields view). Or, in the Farm21 app by clicking the ‘+’ sign in the bottom right corner of the field page. *Please note: If you create the field in the app, you cannot add the field boundaries. You can add this at a later stage in the online dashboard.
Step 5 – Update the sensor settings
In most cases, you can edit prior to going to the field. However, for changing the location it is necessary to be at the spot in your field where you want to install the sensor. How to update setting before going to the field:
- Press ‘other’ in the app (bottom right corner)
- Choose ‘Add/update sensor’.
- Press “QR scan code”, scan the QR code on the device you want to update.
- Update sensor name, calibration profile and other settings.
- Press “activate/update” to save the new settings.
Step 6 – Go to the field and activate your sensors
Insert the new battery only once you are in the field at the location where you want to measure. This ensures that the sensor uses the right signal strength, as it determines this at start-up. After inserting the battery correctly, the LED should light up. You can find the LED in the battery compartment, right next to the battery itself. If the LED does not light up, make sure you have a new battery and it is inserted correctly, make sure you screw the lid tightly back on the device.
If it is still not working, please contact us on the chat option or email us at [email protected]
Step 7 – Change the sensor’s location on the platform
- Press “Get GPS position” in the app. This will reset the location of the sensor. Make sure that the Farm21 app has permission to access the device location. You check this in your device settings.
- Press “activate/update” to save the new settings
Step 8 – Put the sensor in the soil
Create a slot in the soil using the soil peg and a hammer. Slide the sensor into the slot. Do not use force. If necessary, use a little water to loosen the soil.
You will start getting data to your Farm21 account after a few hours. If after 24 hours, still no data appears in the dashboard, contact Farm21 using the chat option or email us at [email protected]
Depending on your plans for the new season, you might want to have more sensors in your field. If you do not own sensors yet, or you need more, get them from your local dealer or visit our webshop.

